Showing posts with label Nails. Show all posts

Thursday, 28 February 2013

Monochrome Nails!

Hey guys 

How are we all this week? I'm having a really good week despite no advances on the job front but hey ho, life continues! I've been looking at clothing and things recently getting myself really excited to come out of Wintry clothing into more flowery, colourful fashion! However, despite my love of colour, i've found myself really drawn to the monochrome trend once again..

I just love simple, classic black and white looks and i think it is a really easy trend to dress up as well as down for a more casual look. I am loving the trend so much just now actually, that i have been inspired to transfer it to my nails!


Not really going to give a full blown tutorial on these as they are pretty simple really, just need a steady hand! I will however, quickly run through what i did for each of them just to help you out a bit if you want to recreate these yourself :)

You need:
I used false nails which cost me £1 from Primark, obviously you can do it on real nails if you want.
Nail art pen in black.
Any white nail polish.
Any clear topcoat.
That's all ;).

What to do:
I use false nails as i did these before bed, using falsies gives me time to let the nails dry without ruining them and as i work in a restaurant i can't wear them until the weekend so, this way they are prepared and ready to stick on for an instant transformation.

Therefore, what i do is pick out the false nails that fit each finger and i then sellotape them onto a clear plastic box (or to any hard, still surface). I do this to keep the nails still and steady on a hard backing just to make painting them a whole lot easier. Then, as these were french tipped nails, i just painted every one of them with two coats of white polish, then using the black nail art pen, i created different monochrome styles on each:


Basically, i find it best to use the pen part of the nail art pen (left photo below) to do the heart and the dots, however the little brush part of the pen (right photo below) is much better for doing straight lines by just brushing along the nail as well as filling in the black part and creating the triangle of the second nail. 


Then, once i had created all the looks i wanted to with the nails i basically waited for them to dry, threw on a top coat and left them to dry over night still stuck to the plastic box. Then, when i was ready i just carefully peeled them off the tape and stuck them on my real nails with nail glue, simples!


Are you guys into the monochrome trend?
Would you do this to your nails?
Thanks for reading, lots of love -

Thursday, 31 January 2013

Nail Diaries #4 - MUA Fur Effects!

Eyyy sexy ladies

I cannot stop signing gagnam style all over again, so annoying. However if you want to kick your own ass at the gym, this song helps me get through, i really want to do the dance while on the treadmill but i know how embarrassing that is going to be so instead i just run, haha! 

Anyway, the point of this post is not about gagnam styling on the treadmill, it is about my nails!

So a while ago i bought MUA's Fur Effects in 'Fuzzy Fluff'. In all honesty, i didn't even know if i was going to like this product or not but the creativity of it and the thought of having fuzzy nails appealed to me and i bought it! I decided today to put it on and see what effect it gave, not really expecting much, but i have to tell you, i am in love. My nails feel so soft and fuzzy and..and..strokeable!

Here's what happened:


On the back, the instructions tell you to paint nails with two coats of polish then sprinkle fluff over, or remove  sifter from pot and dip your nails in. I found it easier to pour some fluff into the lid of the pot, then sprinkle this over my nail, give the nail a tap into the lid to get rid of excess, then roll my finger nail in the fluff to cover any missed spots.


So, using Models Own in Raspberry Crush i painted my nails, on my second coat i did one nail at a time and while it was still wet i quickly sprinkled the fluff over it.


Then, doing one finger at a time i covered them all in fluff! Here's a few pictures to show you the difference between the nails with the fur applied, and those without, then my full hand done:


And when i was completely finished this was the final look:


Overall, i really love the effect. I can't stop feeling my nails! So far they have not chipped at all, some fluff does come off after a while though! I would say, i was worried about getting them wet and sure enough the fluff does look pretty weird after you've just washed your hands! It does dry and go back to normal after a few secs though!

I will probably would purchase the MUA fur effect nails in different colours as i like how my nails look, i love how creative you can get with this product and i love how different this is to other types of nail art! Not something I'd wear all the time but fun to get creative with!

Have you tried fur nails?
What do you think of them?
A

Wednesday, 21 November 2012

Nail Diaries #3

Hello 

Time for another Nail Diary. This is what i have on my nails this week:

Cupcakes!

I'm hating the wintery weather so these make me feel like comfort food happiness without the calories! I actually do this design quite a lot in different colours, i love it.

So basically, to keep this post short and not let it turn into a mad ramble like the majority of my posts, this is how i created this:

Firstly, i painted the tip of my nail using a light pink shade.

Then, using nail art pens, which you can get pretty much anywhere now but the ones i used you can get by clicking here. I used a darker pink and drew lines over the now dried light pink to create the cupcake case.

I then used the white nail art pen to draw an outline of where i wanted my cake to go to and filled that in. I also drew it over the side of the cupcake case to make it look realistic and not just a straight line.

Wait for this to dry then simply use a selection of different coloured nail pens to create dots for the 'sprinkles'.

I added a little gem stone on the top of my cupcakes while the white polish was still a but tacky but they look fine without too!

Then wait for that all to dry and use your favourite top coat to stop any chipping etc!

Done!

Hope you enjoyed this and i managed to keep it short and simple!
Would you try this out on your nails?
A 

Sunday, 11 November 2012

Nail Diaries #2!

Hello 

I've been doing my nails again this week and i love this nail polish so much that i'm making it my second nail diary feature!

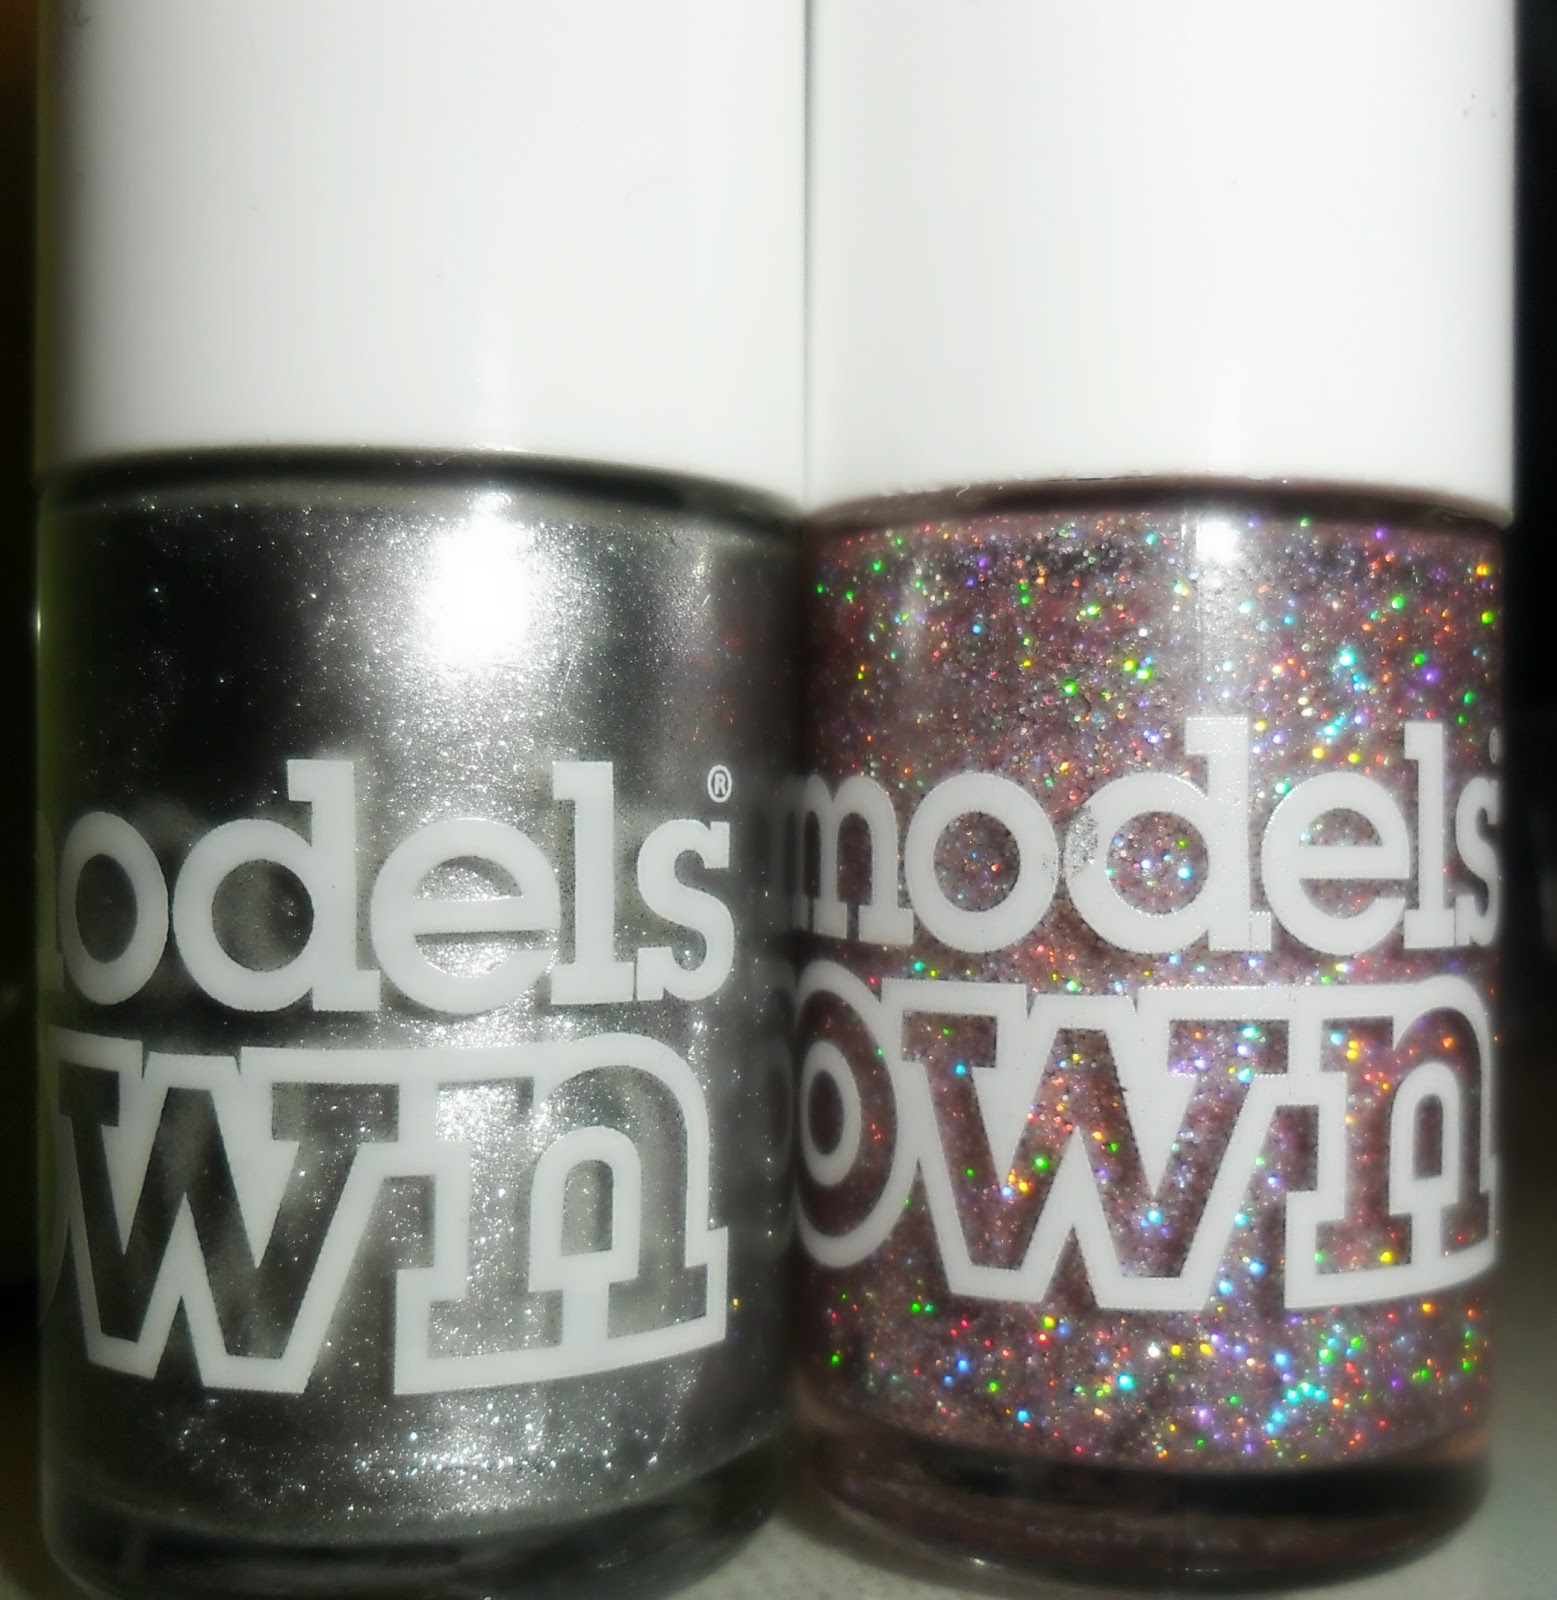
I bought 'Northern Lights' from the Wonderland Collection by Models Own as well as 'Sterling Silver' as Boots currently have a buy one get second half price offer on all cosmetics, eyelashes and nails.


This post is going to focus only on the 'Northern Lights' polish (the right hand bottle)!


It's a really really sparkly polish with a pink base tone. You can also get this in 'Southern Lights' which is as glittery but with more of a purple base.

It is a beautiful colour for winter and it really is very sparkly, especially under bright lights. The picture above shows the colour after two coats of polish with no base colour or anything just the polish alone. 

The only thing with this nail polish is that when dry it does feel really bitty due to the glitter. This doesn't bother me but i know other people that it does. You can solve this by using a topcoat though which i did use the day after i had applied the polish to stop it from chipping and thankfully it didn't effect the glittery appearance of the polish like applying a topcoat sometimes does.

Anyway, i've been wearing this polish since last Sunday and it still looks like this:


So if you're after a new glitter nail polish for the Christmas period i really reccomend this by Models Own, they are cheap as chips at only £5 each and if you pop into boots soon you'll be able to pick another one up for just £2.50!

Have you been trying the Models Own wonderland collection?
What's your favourite polish just now?

A

Sunday, 4 November 2012

Weekend in Pictures!

Hello 
Top left to bottom right:
1// My crazy face. 2// My sexy new nails. 3// Boyfriends fizz face at my sneaky photo taking. 4// Toffee Apple! 5// First fail attempt at eyebrow tattoos. 6// Rose wine for dinner. 7// Empty purse again. 8// Models Own purchases, love! 9// Primark.. again.


What did you get up to this weekend?

Saturday, 3 November 2012

Nail Diaries!

Hello 

I'm thinking of starting a nail art diary where i will post a nail design of mine every few days (not sure exactly how often yet) and explain how the look was created if you want to replicate it. I am in no way a nail expert but i do like my designs, i love doing my nails and i love seeing other people's designs, so i thought i would share my own in a sort of diary!

This week, i'm going to feature an easy peasy design of how i've had my nails for the past little while:


To create this look, what i did was firstly stick on french manicure false nails (i can't find the exact ones i used online but you can buy french mani nails anywhere - boots, superdrug, semi-chem etc.) I love false nails and although i fully know how bad they can be for your nails after repetitive use i still always use them. I do however take proper care of my nails when i do not have falsies on using cuticle oils and strengtheners etc. 

Glue the false nails on all fingers, except the two with the flowers. 

The flower nails i have used in these pictures are a complete cheat as i used four nails out of a set i bought from Matalan. Previously however, doing the almost exact same design, i have used 3d flowers similar to the Matalan ones from ebay here and rhinestones like these ones here to create the same look just gluing them to the nail like the picture above with nail glue. 

This time i used the ones already made from Matalan because in the packet, despite it being very cheap, does not even contain enough nail sizes to cover both hands in the full design! I had to use up some of these nails somehow therefore, i just used them for this rather than doing them myself using ebay ones as i usually would. 

You can get different flowers and rhinestones etc from many different nail sites online. One of my favourite sites for nail art items is Sparklynails.co.uk, they are really cheap, give you useful tips, 'how to' videos and they have a great range of products!

Anyway, to get the glitter effect on the rest of the nails i used Nailene Perfect Tips Polish Guides - here to prevent glitter from getting on the already french tips. To do this, basically just place the tip guide so that it's bottom curve matches up the the bottom curve of the tip already on the nail. 

Alternatively, if your nails are not already french manicured you can use the tip guides to paint your own tips, wait until this dries, then place another tip guide at the bottom to protect the tip while glittering!

Then get a piece of paper or an empty box to catch all the fall out glitter because this bit can get a bit messy! All you want to do is place your hand in the box or over the paper and paint a clear top-coat or base-coat to your nails avoiding the tip area which should be protected by the tip-guide. Then, while this coat is still wet, simply pour glitter all over the nail and repeat this to the remaining nails! I have used a pink glitter this time but i have done this look using silver and blue glitter too all of which i got from Sparklynails.co.uk - here. They do loads of different kinds of glitter but the type i have used in this particular look is called 'Rose Nail Art Glitter Dust'.

Then using a top-coat i just put a quick layer over the glitter and roll the nail in the excess fall out for more coverage. Then when this all dries i just lightly pat the glitter and add another quick topcoat to seal it all in!

Et voila! Nail look complete!


Hope you like and i didn't ramble on too much!
Would you like me to keep up Nail Diaries every so often?

A 

Friday, 12 October 2012

MUA Nail Constellations!

Hello 

Today i had to pop to the bank and while i was in town i decided to drop into superdrug to pick up MUA's 'Undressed' palette. While i was there i wanted to check if they had any of the Nail Constellations as recently every time i have looked they have been out of stock!

I'm really after Leo and Gemini however as expected, none in stock! For once though, they did have a very limited stock of both Libra and Pisces, and so obviously i couldn't resist picking one up to give it a try!

In the end, i picked Libra, which only cost me £2.50! This is a real bargain when you consider similar products such as Ciate's Nail Caviar, although beautiful, retail at £18 each! Also, while i'm on the subject of MUA, superdrug currently have some offers on which you can save yourself £1 with the 'undressed' palette as well as 50p off their new Pro Brow Kit, just thought i'd share that for those who want to pick those up soon!

Anyway, despite not getting the one i wanted, i still picked up Libra and decided to give it a go! Here's what happened:
First off, i painted my nails using MUA's new 'Bright Pink' shade (£1). I own quite a few MUA nail polishes now and i genuinely love them, particularly the newer ones, they are so glossy and dry really quickly and for the price i don't think i could ask for more from them!
Then, when painting my second coat of polish i simply sprinkled the Nail Constellations on using the funnel on the bottle while the polish was still wet!
On parts of my nails which i though didn't have enough beads i just rolled my nail in the excess fall out from when i had been sprinkling them. I really recommend putting down paper or a sheet to catch the fall out otherwise you will be cleaning up constellation beads for the next week! It also allows you to save the beads by folding the paper and sliding the dropped beads back into the bottle.
This is what i created:


Personally, i really love the look and will most definitely be purchasing Gemini when i can find it in stock (if ever!!!). I am keen to see how these wear so i will give you all an update when i have had them on longer than half an hour!

Have you been trying out any of MUA's Nail Constellations? How have you found them?

A 

Monday, 8 October 2012

Nailed It!

Hello 


So today I decided to try magazine nails.

I have tried this before but usually I use false nails and a newspaper. So today, since I have just removed my false nails from the weekend and don't have any occasion to put new ones on for, I decided to try with a magazine on my natural nails! Here's what happened:


Basically, if you don't already know how to do this, I simply chose a magazine, cut a part out and using vodka (yes, vodka - but water works too! I just wanted to test if using alcohol made any difference) and a cotton bud, I rubbed the cut-out onto my already painted white nails, then quickly put a top-coat over to seal it all on!

Some Tips: 
  • Look for clippings with small shapes or different colour writing etc for different effects.
  • Only use clippings with text on a white background (unless of course your base colour is not white like mine). I only figured this out when I used some text which was on a black background and the black just transfers along with the text (obvious to most but, clearly not to me!) and the writing comes out faded.
  • Always use a top-coat, it makes the writing look so much bolder and seals all the font onto the nail.
Have you tired this before?
If not, are you going to?

Hope you enjoyed.

A